Pages

Showing posts with label card. Show all posts

Saturday, February 02, 2013

February Colours

Kathy dared us this week at Daring Cardmakers' and as it's the first Friday of the month it's Colour Combo Challenge Week!

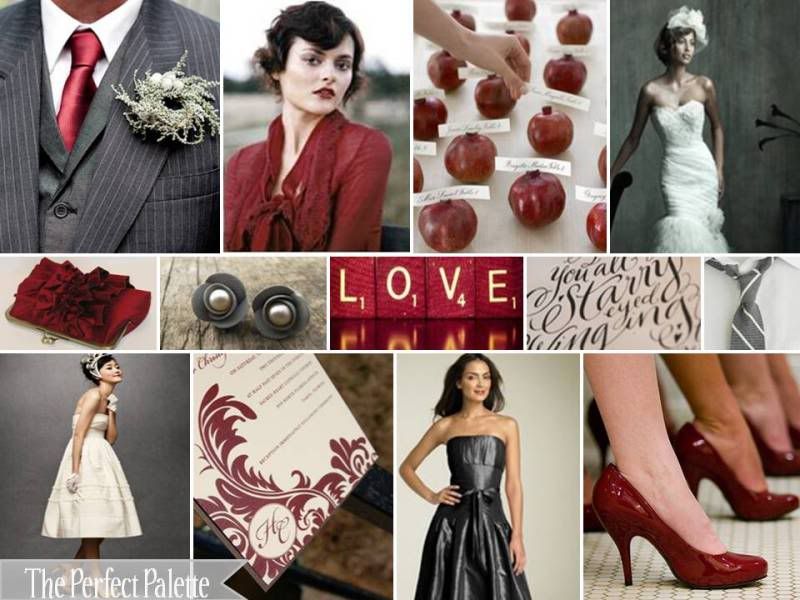
Valentines Day is not far off and I thought this gorgeous montage would help get us all in the mood for romance. Of course, these colours are fantastic for any kind of card, not just Lovey-Dovey ones, so just let your imagination flow with.....
Cranberry, Slate Grey, Pale Grey 
and White

Here's the montage to help get you thinking  
We're looking forward to seeing what you come up with, but for some extra inspiration here are the cards made by our wonderful design team this week


and here's my card;

P2022132

I used Crate Paper papers, and chipboard, American Crafts date stamp, leaf punch from stash, Button Twine, seam binding and flower from The Ribbon Girl and hand crocheted the flowers using the pattern in the first issue of Simply Crochet.

Don't forget to pop by the Daring Cardmakers' blog where you can see all of the beautiful cards made by the DT and find out who was the winner of last week's sponsored dare!

Friday, January 25, 2013

Setting the Scene

This week's Dare over at Daring Cardmakers' is an extra special one - chosen by the very talented Sharon and sponsored by Docrafts with their brilliant Build a Scene Dies;
"It's Sharon here to set this weeks challenge and this week we have a fabulous prize on offer thanks to Docrafts!
Firstly, the challenge - the theme is:
 Setting the Scene
 We'd like you to make your card your canvas for creating your own miniature world!  The theme is totally your choice and you can use whatever you like to create your scene - die cuts, stamps, embellishments - but please use various elements for the 'scene', don't just use one stamp!
Our challenge this week is sponsored by Xcut – the exciting die-cutting and tool range from Docrafts. The winner of the challenge can choose one of the 4 exciting new sets of Build-A-Scene Dies each worth £19.95. Each set features a collection of dies that work together to let you build up layered designs to create a beautiful or fun scene! Choose from Vintage Hot Air Balloon, Nautical, Garden Party or London."

I was lucky enough to get the Garden Party set to play with and made this; 

Wonderful

I used Crate Paper and Papermania papers, Crate chipboard and stickers, Ribbon Girl flowers and Papermania stickers and gems.

Thanks for visiting, please go and see the fabulous little pieces of art that the DT have made with all the dies from the range on the Daring Cardmakers blog, they are absolutely fantastic! 

Saturday, August 25, 2012

Besides the seaside!


The  ΓΌber talented Gez dared us this week at Daring Cardmakers';

Hi, it's Gez here this week and I've got a brand new dare to share with you.. for this weeks dare.. 
I would love to see the sea included on your card.. think  

SUN, SEA, SAND.... 

the living is easy!
Anything to do with beach life can be included! 

Simple!

I'm not sure the current thunder and lightening is beach weather :) but, that aside, I made this;


I used Echo Park Everyday Eclectic digital image and traditional papers and stickers, Kaisercraft frame, a Papermania adhesive pearl, wooden peg, washi tape and staples coloured with a ProMarker from stash.

Don't forget to check out the beachy projects that the DT have made, we have a wonderful Guest Designer, Kate with us and everybody has made amazing cards.

TFL!

Thursday, June 07, 2012

A Winner...

Slightly later than planned... 

The winner of the Ribbon Girl Pearls and Swirls Kit is...

(with thanks to Random.Org)

Karen - congrats :)

and two cards;

The first for Nat's fabulous Red White and Blue Challenge at Daring Cardmakers'


Made using a Union Flag and Mason Jar that I found on t'internet, Ribbon Girl leaves, crown pins, buttons, pleated ribbon, pearls and twine, Ikea tape measure, homemade tissue paper washi tape, Prima letters.

I added sparkle and shine with a wink of stella glitter pens to the jar so am popping this into the current Kuretake challenge - red white and blue with a bit of bling.

and a card for the Ribbon Girls Card Challenge - using ribbon or lace;


 there are some fabulous prizes on offer;


Ribbon Girl red ribbon kit


Stamp from Lili Of The Valley


You can check all the details and see the amazing cards made by the DT on the Ribbon Girls Blog


From The Ribbon Girl I used;

 Lace

I also used Simple Stories papers and stickers, a Pink Paislee Union Flag, a clip from Paperchase and a white ink pad.

TFL!

Sunday, December 18, 2011

Ribbon Girl Challenge #14

After last night's exciting Strictly Final (I think the best man won!) The Ribbon Girls are back with their final colour challenge of the year;

The colours were chosen this month by Vicky and you can see her amazing card  and all the fantastic inspiration from the DT on the Ribbon Girls' blog.

There is a fantastic prize on offer including one of these gorgeous ribbon packs and a £10 voucher from LOTV


and this is my Red, Black and Cream card;


and I used;


Monday, April 06, 2009

Easter card & tag

A couple of bits made using a freebie image....Corrugated card, image from here, Doodlebat border, Bo Bunny ribbon, Doodlebug rub ons, Basic Grey buttons,

TFL :)

Friday, June 27, 2008

Christmas in June

Aha! my turn to set the dare this week and I decided to go all festive and set a nice Christmas themed dare (yup I know 'tis only June...)


Basic Grey Sultry, Cuttlebug embossing, Doodles, Hobbycraft ribbon, Printed '{Proper Chrimbo}' sentiment.

and this was my little extra this week - using the theme of wood...


Wood effect paper, Doodlebug card and flowers, printed sentiment.

and finally, a card made with Doodley Dillon...


The doodles are not mine - but I do know the person that made them.... :) Scenic Route Papers, Doodlebug ric rac and brad.

TFL :)

Tuesday, February 27, 2007

Monogrammatic

M is for Monogrammatic - this week's little extra and also for Mum :)

Using my tried and tested method of chucking bits at a card and hoping that they will work :) Here is mine;


All bits and bobs are K&Co, Brads are from eBay and Eyelets are from the Papermill Shop. Hand stitching (for a change lol) and some inking.

Forgot to mention details of the card below and I have had requests for the font - it is super yummy :) It is the King & Queen font, I got it from Dafont, link is here.

All the papers were again K&Co, Prima Ribbon and Hand Stitching and Inking.

There are some other Monogrammatic Cards on the blog for inspiration, you really should go see :D

Monday, February 26, 2007

Boys will be boys

A very wet half term over and Josh is safely back to school, we didn't get a lot done last week cos the weather was so pants but did go over to visit Nan and Grandad, Auntie Ros and Uncle Pete were there too so it was good to catch up. The boys had their usual fun and played with everything that they probably shouldn't including as usual, booting Nan from her chair so they could take turns in going up and down in it....


Josh also went to a party yesterday and wanted to make a Birthday card himself here it is :)


It fits in pretty well with the current little extra over on the Dare blog :)

and.... after being very reliably informed by the fantabulous Em, we now have a Papermill in Swindon... woohoo! Managed a quick trip there Saturday, they had some really fab card with a faux Bazzill texture, was quite restrained and only bought one box, safe in the knowledge that should I need anymore, it is within walking distance of my house *big grins*

Thursday, December 14, 2006

The Ink is Black....

....The page is white... (with a splasharoonie of colourization) Or as the Dare says, 'Black and White Christmas cards with a splash of colour'

A little pushed for time this week, Jared is sleeping a little better but it is taking a while for me to catch up. I made the huge leap to Blogger Beta as I could no longer comment on all your wonderful blogs (was slightly annoyed at kinda having to do it Tsk!) I apologise for the lack of comments, all should be fixed now :) (and I have sorted (I think) the also annoying problem of everyone's comments here appearing as anon.)...

I made a predominantly printed card this week, for ease...
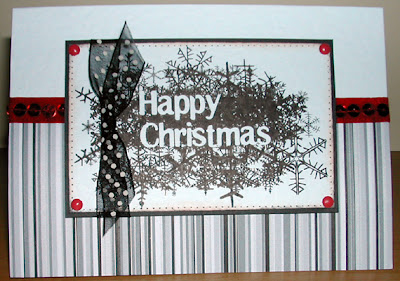


Ribbon is from M&S (from the outlet store wouldn't pay full price for it:)) and Little Silver Hat, and brads are from the stash that happily plopped on to my doormat earlier this week!

and.... here's how you make a cool background...

*I know that I am not the first person in the whole world planet (as Josh would say!) to make a background using word but this is my way of doing it :)*

Don't forget that if you click on the piccies, they become readable!

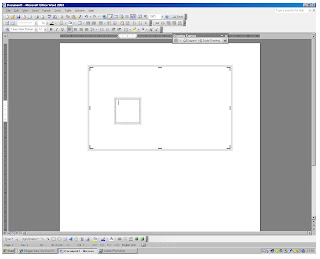
Open word and choose insert - text box

Type lots of snowflakes into the box in differing sizes- don't forget that you can manually change the size if you want super huge ones.

I used Risus LCB Kringlebats

Click on format - Text Box and choose no line and no fill for the box.
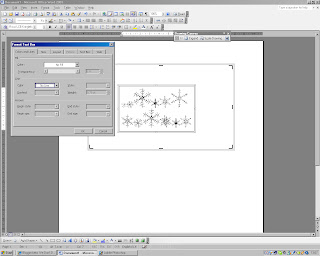


Make lots and lots of other boxes in the same way.... and drag them over the top of one another *top tip* if you make some of them bold then the middle gets dark very quickly (which is a good thing!)


Once you have lots and lots of boxes , type Happy Christmas (or any other sentiment that you choose!) and change the font to white. Again, select no line and no fill from the format - text box menu and drag this box over the darkest area. nb the photo only shows pink to help you lol (and I like pink!)

Et Voila! You can use this with words, other dingbats pretty much anything that you can type to make groovy backgrounds - ok so it is a little time consuming, but once you have it done and saved, tis easy to print, trim, ink, stitch, doodle...... onto :)


and that is that! Big hugs to Debbie who has suspended her Card Making for the time being.{{{{{HUGS}}}}} Debs has been a fantastic 'Darer' and I will miss you.

Don't forget to check out the blog for all the other Black and White with a splash of colour cards. 'They are all amazing cards this week (as they are every week!) and don't forget to show us your fantastic creations :)