Pages

Showing posts with label Joshua. Show all posts

Sunday, May 27, 2012

The one with a Party (part deux)

Continuing the weekend's party theme, the boys have been helping to make mini cards from Paint Chips;


supplies - paint chips, bazzill card, spellbinders nestabilities circle dies, elephants in cherry trees font, crown brads.

The boys both have Scarlet Fever so this gave them a little something to do whilst keeping their spottiness out of the sun...

These would be fantastic as place cards or mini invitations, I love the way that they even come pre folded :)

TFL!

Friday, October 15, 2010

The Anniversary Waltz

Yesterday was Mum's birthday and the boys made her cards.

Josh's clean and simple design;


Jared's portrait design (luckily I think I have another skein of thread on that colour!)


and my card, based on Kazan's fabulous sketch #63 over at 2sketches4you;


I used;
Crate Paper Girl Paperie & vintage sheet music papers
Prima Marketing letters and pearls
Ribbon Girl ribbon and twine
EK Success butterfly punch
Paper flowers
Hand stitching and inking.

and this week's Daring Cardmaker's dare is a team dare celebrating our 4th Anniversary;

As you know, October is our Anniversary month - we're 4 years old in a couple of dares time so it's definitely time to celebrate. So our theme for this week's challenge is:

Welcome to the Dance
We'd like you to take Dance and Dancing as your inspiration and do some fancy footwork on your cards this week. We can't wait to see how you shimmy along with this one. Be it Ballet, Street-dance, Flamenco or Tango, the (dance) floor is yours

I used the title of the dare and made this;

and I used

Digital sheet music purchased online
Bazzill cardstock
Vintage papers
Tim Holtz birdcage and on the edge sizzix dies
Echo Park stickers
Ribbon Girl ribbon
Pebbles Inc. rub on
Kaiserkraft letter stickers

TFL - Don't to check out the gorgeous anniversary and dance inspired cards that the other DT members have made here.

Tuesday, March 24, 2009

A few piccies...

Everyone here has had the most nasty coldy type thing so not much blogging going on...

A card for Josh's 7th birthday;
October Afternoon papers and die cuts, Scenic Route rub ons, Doodlebug rub on and Papermania brads

Josh celebrated his birthday (and Red Nose Day) with red hair...

and Jared and I made red nose cakes (90 of them(!) for both their classes)...A card for Kathy's most marvellous dare, using all the yummy bits and bobs that she sent to me to make the card with...
A card for one of Josh's friend's birthday...
MME papers, sewing, Bo Bunny ribbon, Scenic Route rub ons

and a tag.
More MME papers, Papermania scallop edge, gems, Bo Bunny ribbon.

Phew! TFL :)

Monday, January 19, 2009

Thank you...

I made a card over the weekend for the Papertake Weekly challenge, based upon a brilliant sketch by Dawny...

Papers are Basic Grey, Paperchase label, MM letters, ribbon and flower from stash.

Josh had an op on Friday so is at home recovering this week, all fixed now though so all good :)....(he wanted a piccie taken of the super duper magic cream)...


have a good week

jo xx

Saturday, December 20, 2008

Nigella's Chocolate Fudge


Continuing the soon to be a tradition of giving teachers some yummy fudge, the boys were very busy in the kitchen this week.

This batch had a little change with the substitution of nuts and berries for pistachios. Recipe coming up, courtesy of Nigella :)

Wednesday, December 10, 2008

Nativity time...


Josh and Jared both had their (separate) nativities this week - Josh was originally a shepherd but had to step up to the well known nativity role of a clock at the last minute before succumbing to Chicken Pox (again) and being sent home, Jared fulfilled his role as a boy from China in 'The Snow Bears Surprise' although he was a little distressed at having to wear a dress...

Wednesday, November 12, 2008

Spookiness

The boys celebrated Hallowe'en by becoming vampiric and zombified.


Josh was really thrilled as he won a 'best costume' prize at the party that they both went to and I made some tags...

and a quick spooky card...

TFL :)

Sunday, July 20, 2008

CPS #73

We braved Next sale yesterday - not at the wee early hours of the morning but at a far more normal time of the afternoon and actually it was not busy - far more girl clothes as usual than boys but did pick up a few bits and bobs :) Had to chuckle at the signs in the girlie section entitled 'Big Girl's Bottoms'.....

Another of Jared's friends turned 4 yesterday, I used the CPS sketch #73 to make this for her....


I used Basic Grey Euphoria, Bazzil scallops and a 7gypsies stamp, I cut the circle with an x-cut shape cutter, hand cut butterfly, inking and a little bit of doodling.

And a little bit of garden tidying, they boys were allowed to stay up late for a little bonfire....


:)

Friday, March 28, 2008

Pins and Needles !!!

This week's dare is set by the most marvellous Jane....

Now, on to this weeks dare (can you believe its Friday once again ?!:) Well, its my turn (Jane) to set the dare this week. Its very simple really (prickly maybe but..:) I want you to design a card to any theme- but I want you to include pins or needles of some sort. Sewing needles, safety pins, dressmakers pins- any type of pin goes !:)


Ordinary notepaper, black card, Papermania stars, doodling, inking, provocraft (I think) really old stickers and the all important pin.

Josh was Star of the day yesterday at school and bizarrely to celebrate they get additional homework related to 'Sam' the big cuddly monkey - we get the honour of his presence and Josh then has to recreate something to do with his time spent with us - Star of the day equals no homework by my way of thinking.....

So we cunningly hired the help of the rather imaginatively titled magmypic.com and made this...


:)

Sunday, March 23, 2008

Happy Easter!

I hope everyone is enjoying a happy Easter break :)

A cyberman has visited...

and he made this card...

and Jared made this one...


The Easter bunny was very clever and made egg toppers using Kate Hadfield's marvellous Easter Treats collection...


and 100% inspired after reading Kirsty's Jaffa Cake making, I dug out an old recipe and we all made some homemade Jaffa Cakes...

The boys did the icing and actually did a far better job than I would have done!


Recipe for homemade Jaffa cakes.
Ingredients
3 eggs
3 oz sugar
4 oz self-raising flour
Marmalade - I think you can sieve it but we used Golden Shredless for ease :)
4 oz plain chocolate
2 oz milk chocolate - You are probably meant to use the posh stuff with lots of cocoa solids etc but the cheapo ones work just fine :)
rind of 1/4 orange, finely grated
1 Tbsp oil (not Olive) cos that would be yucky in these.
1.5 Tbsp water

Method
1. Whisk the eggs and the sugar until they are super extra thick and creamy -use an electric whisk as it takes ages.
2. Fold in the flour.
3. Spoon the mix into cake tins - make sure the tins are well greased.
4. Bake for around 10 mins at gas mark 6 - I think this is about 200°C.
5. Cool the cakes/biscuits - they are not really either...
6. Put the chocolate, orange rind, oil and water into a bowl over a pan of hot water and stir until all is melted, remove from heat.
7. Spread marmalade on the bottom of each cake.
8. The chocolate should be cooling nicely, once the chocolate starts to thicken spoon it over the cakes.
9. Leave to set - not in the fridge
10. Eat and enjoy the yumminess.

Jaffa Cakes. Done. - the mix makes around 24.

Friday, March 14, 2008

Teen Spirit

I got this fantastic award fromLilibet and Jozza and Judy :) Thank you so much!

I am supposed to pass it on to 10 others, but there are so many blogs out there that inspire so if you have not received this award yet, consider yourself awarded! :)


Josh turned yesterday, he spent most of the day glued to his new beloved Nintendo DS but was particulary excited to have the day off - school has been closed most of the week due to roof being blown off in the winds, we went to Jolly Roger and the obligitory McDonalds for birthemeday tea time treats :)

This weeks dare is set by the fantabulous Rachel :)


"Well I thought we have had plenty of flowers and hearts and girly things so I would like some cards with some teen spirit please."


Weirdly I made a DL card and ....timed it... it took 35 minutes :)


I used Scenic Route paper, printed sentiment, MM and Queen and Co brad, Grungeboard skull - coloured it with a gel pen, added Ranger Perfect Medium and embossing powder then heated it too much so that it crackled, was a tinsy bit worrying when it started smoking lol but looks ok :), 7Gypsies dots stamp and a Woodware punch, inking and doodling.

TFL :)

Monday, February 18, 2008

The tooth fairy....

...visited at the weekend :) After about 3 weeks of wobbling, prodding and pushing, Josh finally lost his first tooth. I made this for him - at the request of the tooth fairy of course :)


and Josh's egg came back from school for a home visit...


Jase helped with the painting - à la the Madagascar penguins - *smile and wave boys*

not too sure what to do with it as Josh has been looking after it for over a week now - it's got to start being stinky at some point?!

and Jared has been a dragon at school for their Fairytale Wedding :)


TFL :)

Saturday, December 22, 2007

Nigella's Fudge


I saw a fantastic recipe for fudge on the telebox - made by Nigella the domestic goddess and decided to make a load with the boys to give to their teachers and teaching assistants - between them they have nine! After the shock of both boys deciding that they wanted to make all the cards for their friends... ( we did go for the simple option of punched shapes and sizzix trees :))

We made lots of fudge, this is the recipe;

12oz dark chocolate, at least 70 per cent cocoa solids, chopped
1 x 14oz can condensed milk
1oz butter
pinch salt
5¼oz unsalted pistachios, shells removed

Method
1. Place the chopped chocolate, condensed milk, butter and salt into a heavy-based pan over a low heat and stir until melted and well combined.
2. Place the nuts into a freezer bag and bash them with a rolling pin, until broken up into some large and some small pieces.
3. Add the nuts to the melted chocolate mixture and stir well.
4. Pour the mixture into a 23cm/9in square tray, smoothing the top with a wet palette knife.
5. Let the fudge cool, then refrigerate until set.
6. Cut into small pieces approximately 3cm x 2cm/1¼in x ¾in. Cutting 7 x 7 lines in the tin to give 64 pieces best achieves this.
7. Once cut, the fudge can be kept in the freezer - there's no need to thaw, just eat straight away.
We adapted it to and made milk chocolate fudge with cherries...

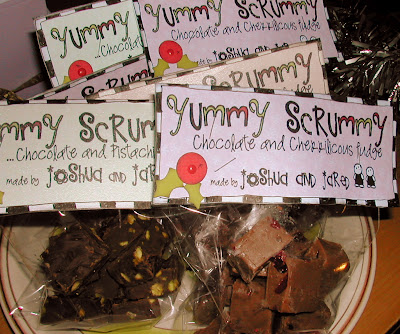
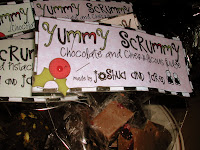
and I made some headers for it with the help of some fonts, doodling and photoshop. Hopefully, nine happy teachers :)